Today I want to share with you a special recipe that has filled me with joy and satisfaction 💝 the delicious Kawaii Face Cookies. These cookies are not only quick and easy to make at home, but they also offer an excellent opportunity for The little ones in the home have fun in the kitchen. I am sure you will enjoy both the process and the final result. Plus, these cookies are perfect for sharing with friends and family. Personally, I made them for myself and to share with my boyfriend, and they turned out quite special. He ate them pretty quickly, which is always a good sign. So, without further ado, here is the full recipe.
Hoy quiero compartir con ustedes una receta especial que me ha llenado de alegría y satisfacción 💝 las deliciosas Kawaii Face Cookies. Estas galletas no solo son fáciles y rápidas de hacer en casa, sino que también ofrecen una excelente oportunidad para que los más pequeños del hogar se diviertan en la cocina. Estoy segura de que disfrutarán tanto del proceso como del resultado final. Además, estas galletas son perfectas para compartir con amigos y familiares. Personalmente, las hice para mí y para compartir con mi novio, y quedaron de una manera bastante especial. Él se las comió bastante rápido, lo cual es siempre una buena señal. Así que, sin más preámbulos, aquí les dejo la receta completa.

Ingredients:
- 1 teaspoon lemon zest 🍪 1 cucharadita de ralladura de limón
- 3 oil tablespoons 🍪 3 cucharadas de aceite
- 2 butter spoons 🍪 2 cucharadas de mantequilla
- 3 ½ tablespoons granulated sugar 🍪 3 ½ cucharadas de azúcar granulada
- 1 ½ cups of wheat flour 🍪 1 ½ tazas de harina de trigo
- 1 splash of vanilla (to taste) 🍪 1 chorrito de vainilla (a gusto)
- Sugar glass 🍪 Azúcar glass
- A squeeze of lemon 🍪 Un chorrito de limón
- Food coloring (black and pink, or whatever colors you prefer) 🍪 Colorantes alimentarios (negro y rosado, o los colores que prefieras)
Preparation:
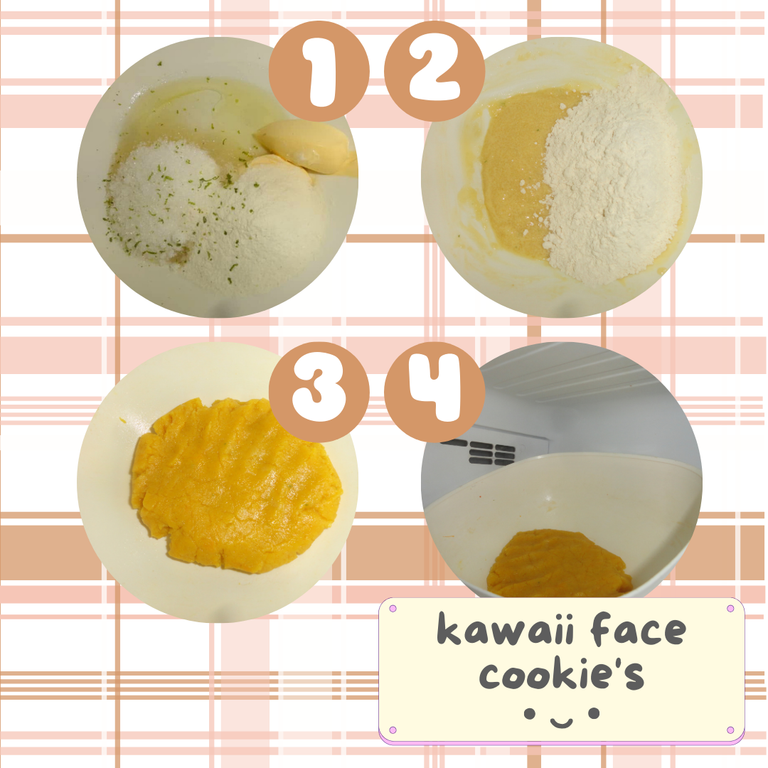
We start by mixing the liquid ingredients. In a large bowl, add the 3 tablespoons of oil along with the 2 tablespoons of butter at room temperature. It is important that the butter is soft to facilitate mixing. Also add the 3 ½ tablespoons of granulated sugar and mix everything very well with a teaspoon. Add a teaspoon of lemon zest and a splash of vanilla to taste, this will give an aromatic and delicious touch to our cookies. Continue mixing until all the ingredients are well integrated. 👩🍳 Once the liquid ingredients and sugar are well mixed, start adding the wheat flour little by little. The key here is to do it progressively to avoid lumps and make sure the dough is the right consistency. Continue mixing with the spoon until you obtain a firm dough. If you notice that the dough is a little watery, don't worry, just add a little more flour until you achieve the desired consistency. The dough should be workable but not sticky. 👨🍳 Place the dough in the refrigerator for approximately 10 minutes. This step is crucial so that the dough gains consistency and is easier to handle. Meanwhile, we can take the opportunity to prepare the frosting and the utensils that we will need for the decoration.
Comenzamos mezclando los ingredientes líquidos. En un bol grande, añade las 3 cucharadas de aceite junto con las 2 cucharadas de mantequilla a temperatura ambiente. Es importante que la mantequilla esté suave para facilitar la mezcla. Añade también las 3 ½ cucharadas de azúcar granulada y mezcla todo muy bien con una cucharilla. Incorpora la cucharadita de ralladura de limón y un chorrito de vainilla a gusto, esto le dará un toque aromático y delicioso a nuestras galletas. Sigue mezclando hasta que todos los ingredientes estén bien integrados. 👩🍳 Una vez que los ingredientes líquidos y el azúcar estén bien mezclados, comienza a añadir la harina de trigo poco a poco. La clave aquí es hacerlo de manera progresiva para evitar grumos y asegurarnos de que la masa tenga la consistencia adecuada. Sigue mezclando con la cucharilla hasta obtener una masa firme. Si notas que la masa queda un poco aguada, no te preocupes, simplemente añade un poco más de harina hasta lograr la consistencia deseada. La masa debe ser manejable pero no pegajosa. 👨🍳 Coloca la masa en la nevera por aproximadamente 10 minutos. Este paso es crucial para que la masa tome consistencia y sea más fácil de manejar. Mientras tanto, podemos aprovechar para preparar el glaseado y los utensilios que necesitaremos para la decoración.
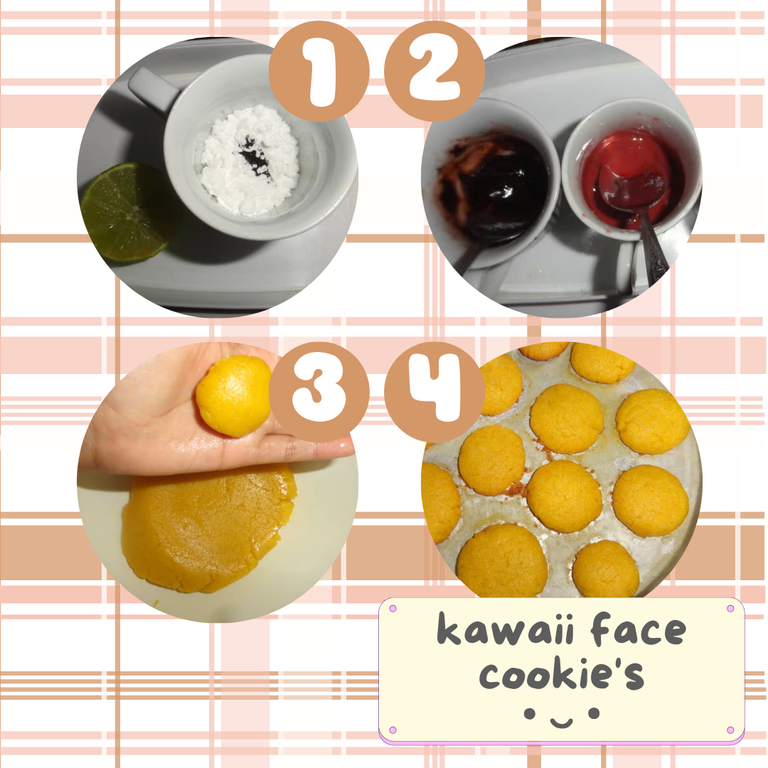
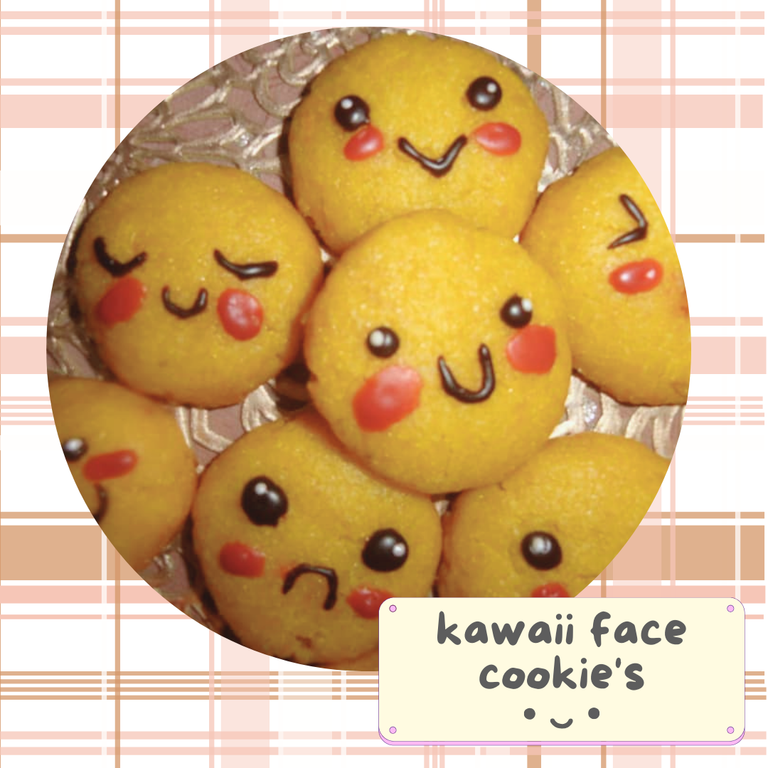
While the dough rests in the refrigerator, we are going to prepare the glaze that we will use to decorate our cookies. We will need powdered sugar and a splash of lemon. In a small bowl, mix the powdered sugar with the lemon until you obtain a thick but manageable consistency. Divide the frosting into small portions and add food coloring to get the colors you want. I used black and pink food coloring, but you can experiment with other colors if you wish, creativity is your best ally here. 😄 Once the dough has rested, take it out of the refrigerator. With clean hands, form balls of different sizes. This will give a fun and varied touch to our cookies. Place the balls on a baking sheet, leaving space between them so they don't stick together as they expand during baking. Preheat the oven to 180°C and bake the cookies for approximately 20 minutes, or until lightly golden. It is important that the cookies are not too hard in the oven, they must maintain a soft and pleasant texture. Keep a close eye on them to prevent them from burning. ✨ Once baked, take the cookies out of the oven and let them cool for about 20 minutes. This step is essential so that the frosting adheres well to the cookies. Now comes the most fun part: the decoration. You can use a piping bag to apply the frosting or, like I did, use sticks dipped in the frosting. This will allow you to make detailed and precise designs. Decorate the cookies with happy 😊, sad 😐, funny 😝 and calm ☺️ faces to give them that lovely kawaii touch.
Mientras la masa reposa en la nevera, vamos a preparar el glaseado que usaremos para decorar nuestras galletas. Necesitaremos azúcar glass y un chorrito de limón. En un bol pequeño, mezcla el azúcar glass con el limón hasta obtener una consistencia espesa pero manejable. Divide el glaseado en pequeñas porciones y añade colorantes alimentarios para obtener los colores que desees. Yo utilicé colorante negro y rosado, pero puedes experimentar con otros colores si lo deseas, la creatividad es tu mejor aliada aquí. 😄 Una vez que la masa ha reposado, sácala de la nevera. Con las manos limpias, forma bolitas de diferentes tamaños. Esto le dará un toque divertido y variado a nuestras galletas. Coloca las bolitas en una bandeja para hornear, dejando un espacio entre ellas para que no se peguen al expandirse durante el horneado. Precalienta el horno a 180°C y hornea las galletas durante aproximadamente 20 minutos, o hasta que estén ligeramente doradas. Es importante que las galletas no queden demasiado duras en el horno, deben mantener una textura suave y agradable. Vigílalas de cerca para evitar que se quemen. ✨ Una vez horneadas, saca las galletas del horno y déjalas enfriar durante unos 20 minutos. Este paso es esencial para que el glaseado se adhiera bien a las galletas. Ahora viene la parte más divertida: la decoración. Puedes usar una manga pastelera para aplicar el glaseado o, como hice yo, usar palitos remojados en el glaseado. Esto te permitirá hacer diseños detallados y precisos. Decora las galletas con caritas felices😊, tristes😐, divertidas 😝 y calmadas☺️ para darles ese toque kawaii tan encantador.
Kawaii face cookie's 😄😊😐
Making these Kawaii Face Cookies was a really fun and rewarding experience. Not only did I enjoy the process, but it was also a wonderful way to share a special moment with my boyfriend.
Preparar estas Kawaii Face Cookies fue una experiencia realmente divertida y gratificante. No solo disfruté del proceso, sino que también fue una manera maravillosa de compartir un momento especial con mi novio.
Seeing the smile on his face as he ate the cookies was the best reward. I am sure that you will also enjoy this activity, whether for yourself or to share with your loved ones. So, go ahead and try this recipe and let your creativity fly with the decorations. I hope you like them as much as we do!
Ver la sonrisa en su rostro mientras se comía las galletas fue el mejor premio. Estoy segura de que ustedes también disfrutarán esta actividad, ya sea para ustedes mismos o para compartir con sus seres queridos. Así que, anímense a probar esta receta y a dejar volar su creatividad con las decoraciones. ¡Espero que les gusten tanto como a nosotros!

See you soon!
Hasta pronto!